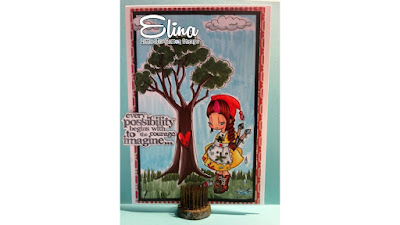
Now here's a pic of the card I made using the image:
The card measures 4 1/2" x 6 1/2," and uses a sheet of white card stock as the base. For the card layer, I adhered a sheet of patterned paper from a Recollections, "All Occasions," 12' x 12" paper pad, trimming it down to 4 1/4" x 6 1/4". I then set the card aside to work on the image.
I printed the image on white card stock and drew in a background scene and some paint splatters.I wanted to give the background a coloring book feel with the image adding color to her world.
Once I had everything penciled in, I used my fine tip, black marker to darken the lines.
Next, it was time to color everything in using my alcohol markers.
Here's a rundown of the colors I used:
-Background-
-Sky- B12, C01, C02
-Tree & grass- E74, E79, G94, G99
-Main Image-
-Skin- E00, E11, R20
-Hair- E13, E15, E29, RV19, RV55
-Outfit- Y00, Y13, Y15, R14, R17, R27, E94, E99, C01, C02
-Paint brushes- C06, C08, Gold gel pen
For the paint splatters on her dress, I filled them using the same colors I used in the background. I used my Glossy Accents to make the splatters pop. Next, I trimmed the image panel down to 3 7/8" x 6". Then, I drew in a 1/8" border around the image and filled it in using my 100 Black Copic marker. I adhered the panel to the card base using pop dots.
To complete the card, I stamped a sentiment, "Every possibility begins with the courage to imagine..." from the Tim Holtz Alterations, "Possibilities," stamp set.
This is an awesome set because it includes a set of dies to go along with the stamps. So, once I had the sentiment stamped out, I was able to use my Cuttlebug to die cut it as well.
And ta-da! Card complete!
I hope you all enjoyed this card for today!
Thanks for stopping by, and enjoy the rest of your day! :)
Post edited by: Shyann Martinez


No comments:
Post a Comment