Pages

Sunday, April 24, 2016

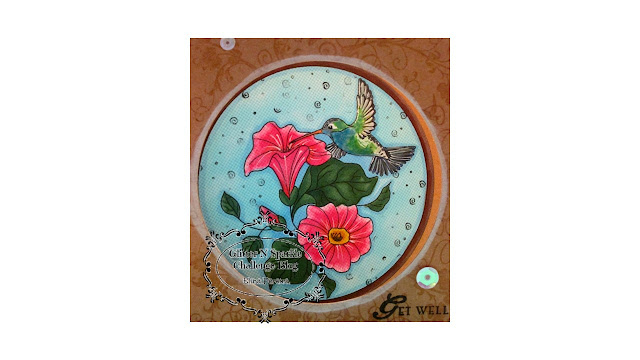
"So I tip my hat, Imagine That!" "Get Well Soon" card featuring Imagine That stamps!

Hey everyone, happy Sunday to you all! I hope your evening is off to a great start! For today's post, I'll be sharing a card I made for the latest challenge over at the Glitter N' Sparkle blog. The theme this week is "Anything Goes," and we have a great sponsor lined up.


They are graciously offering a $10 Gift Certificate to our winner, so please make sure to head over to the Glitter N' Sparkle Challenge blog to play along.

      Here's a pic of the card for you to check  out:
The card measures 5 1/4" x 5 1/4" and uses a sheet of craft card stock as the base.
I stamped a subtle background on the card stock using a Fiskars Ivy stamp and my VersaMark ink.
*This is a great technique to use when you want to forego adding layers to your card base*
With that done, I put it aside to work on the main focal point.

The image I used is the "Pretty Petunias" image from Imagine That.
This is a beautiful image to color, and I used my alcohol markers to achieve a bright and colorful look.

    Here's a list of colors I used:
-Flowers- RV000, RV14, R14, Y13, Y18
-Leaves- G46, G28
-Hummingbird- B12, B14, 202, G43, C08, C03, E97
 For the hummingbird, I referenced a photo from Google Images to choose my colors. I wanted to color him in as close to the actual bird as I could. I also added some shimmer to the bird's breast using a combination of metallic and gel pens in shades of green and blue. I added a few highlights to the wings using my Gelly Roll white pen.

Next, I used the largest circle die I had to cut the image out. I colored in the border that was included in the image using my E74 and E29 Copics.

To assemble the card, I used that same circle die to cut an opening in the front of the card.
I then positioned my die cut image through the hole and adhered it inside of the card. Next, I rounded the corners and highlighted the edges using my big brush, white pigment marker from Faber-Castell.

To finish it off, I added the sentiment, "Get Well Soon," and a few iridescent sequins.

And voila! Card complete!
                                                           I hope you all enjoyed this card!
                                       Thanks for stopping by, and enjoy the rest of your evening! :)


Post edited by: Shyann Martinez


Tuesday, April 19, 2016

Wood Blocks into Mixed Media Decor for your Home!!

Hey everyone, happy Tuesday evening to you all! I apologize for the late posting of this DT project for the  Jiggery Makery blog, but it has been a super hectic crafting day for me. Hubby has decided to sell a few of his woodworking projects at a local craft fair in two weeks. So, I have been extra busy coming up with items that I could sell alongside his things. Today's post will be a quick one, with a video coming soon to follow up on how I created the project I'm sharing today.
                                              
                                                         Here's a pic for you to check out:
I used a piece of 5 3/4" x 5 3/4" block of wood for this project.
Here's a pic of what it looked like before I altered it:


To get this block to look like the one above, I used a variety of paints, sprays, resin pieces, and texture paste.

I added some stamping, plus the quote that I got from Pinterest.
The quote states:
"Knowing when to walk away is: Wisdom,
Being able to is: Courage
Walking away, with your head held high is: Dignity."

The image I used for this project is the lovely, "Jayne" from the etsy shop.

Here's a list of the colors I used:
-Skin- E00, E11, R20
-Hair- E13, E15, E29
-Dress- R12, R14, C01, C02


And voila! Project complete!  


I hope you enjoyed this project!
I will be putting up a video on my channel soon showing you the step by step process.
Thanks for stopping by, and enjoy your evening! :)


Post edited by: Shyann Martinez


Sunday, April 17, 2016

"Sending Good Vibes" with a Spanish Flair plus a New Challenge!!

Hey everyone, happy Sunday to you all! I hope your day is off to a relaxing start! For today's post I have a card I created for the latest Glitter N' Sparkle challenge. The theme this week is "Red and White." We have a great line up of sponsors for this challenge, who are graciously awarded prizes for our Top 3 winners. They are:
                                                                -Sami's Stamps-

                                                   
                                                                   -Bugaboo-
                                                    

                                                                    -Ike's Art-


For this project, I used the"Spanish Dancer" image from Ike's Art to make an easel card. I also have a video up on my channel which shows step by step the coloring process for this image. I hope to share that link with you all soon, so please stay tuned.
                                 With that said, here's a pic of the card for you to check out:


                                    I began the assembly of this card with the image first.
       I trimmed the image panel to 4 1/2" x 5 1/2" and colored it in using my alcohol markers.
                                          
                                               Here's a rundown of the colors I used:
                                                   
                                                         -Skin- E11, E13, R20
                                                            -Hair- E13, E15
                             -Dress- R14, R27, E74, C01, C02, Gelly Roll pen in White
                                                          -Silhouette- C06, C08

  I drew in a silhouette, some music notes, and flooring to set a quick scene for the dancer. Once I had all the coloring done, I used my Avery Elle stamp set to create the sentiment, "Sending Good Vibes."
I layered the image panel on a sheet of red patterned paper from a Recollections paper pad, and cut it at 4 3/4" x 5 3/4". To complete the image, I added a wavy border along the edges using my fine tip black marker.


 I used a pieces of white and red patterned card stocks to create the easel card base, and I adjusted the measurements to fit the panel. However, instead of cutting the white card stock to 4 1/4' x 8 1/2," I added an inch to each of the measurements to give me a 5 1/4' x 9 1/2" base. Next, I scored the card stock at 5 1/4" x 7 3/8," and folded it using mountain and valley folds. For the easel part of the card, I cut my pieces 5 1/4" x 5 1/4" . Then, I assembled the pieces and adhered the image panel to the 5 1/4" x 5 1/4" piece.

To finish the card off, I stamped the "Hugs" label to act as my stand for the easel, and added a few red sequins.

                                                              And ta-da! Card complete!

                                                  I hope you enjoyed this card for today!
                                 Thanks for stopping by and enjoy the rest of your Sunday! :)


                                                      Post edited by: Shyann Martinez


Wednesday, April 13, 2016

"Out of Limitations comes Creativity" Mixed Media Butterfly card!

Hi everyone, happy "Hump" day to you all! I hope your Wednesday is off to a good start! For today's post, I wanted to share a card I made as part of the Decorate To Celebrate  design team, for their newest, "Anything Goes" challenge. Please make sure to stop by the DTC blog if  you want to play along.
                                                 Here's a pic of the card for you to check out:


The card measures 4 1/2"  x 5 1/2," and uses a sheet of Tim Holtz "Menagerie" patterned paper for the base. I distressed the edges of he paper, and then set it aside to work on the main image.

I cut a sheet of water color paper to 4" x 5" to create my panel. I wanted to create a subtle pattern on the paper, and to achieve this I used my Prima stamp set (Item #551056) and my "Sahara Sand," Stampin' Up ink pad. I chose a few of the images from the set to create the background.

Next, I used a Tim Holtz Ideaology "Limitations" stamp set for the butterfly, stars, and fig. column.
I stamped these images on using my VersaMark ink, sprinkled black embossing powder over the top, and heat set it. Once everything was set, it was time to do some water coloring.

I used my Distress Markers in "Shabby Shutters" and "Victorian Velvet" to add color to the panel.
Then, I used the "Shabby Shutters" in the center, concentrating the color mainly on the butterfly. I kept the color dark in the center, and let it slowly fade out from there. I used my heat tool to dry the panel before adding the next color. Next, I added color to the rest of the panel with a wash of "Victorian Velvet."


                     I used my Glimmer Mist, in "Kraft," to add a bit of shimmer to the background.

    To finish the card off, I added brown cording tied in a bow, and the sentiment, "Out of Limitations      comes Creativity".  I adhered the image panel to the card base using pop dots.

                                                        
                                                               And voila! Card complete!


                                                     I hope you all enjoyed this card for today!
                                        Thanks for stopping by, and enjoy the rest of your day! :)


Post edited by: Shyann Martinez


Tuesday, April 12, 2016

Digital Stamp Make-Over featuring Jiggery Makery's "Princess" digi!!

Hey everyone, happy Tuesday to you all! I hope your day is off to a good start! Today's post will be a little different. Instead of featuring a project, I will be showing you how to alter your digital images.
I have done a few tutorials on my channel in regards to this subject, but this time around I thought I would share the process step by step. If you are a follower of my blog, you know that I like to create background scenes to compliment the images I use. I oftentimes like to add extra elements to the images, whether it be altering the outfits or adding patterns and stitching. This is my first attempt at altering one of Adele's wonderful images, so I'm not sure it work with other digis, but it worked out in this case.
                                                Here's a pic of the image before and after:


I used the"Princess" image from the Jiggery Makery Etsy shop. 
 First, I looked at the image to see what would be the easiest changes to make.
 I then decided that the hair and dress would make the most impact.

*To keep the post short, I will list the markers I used in the finished image, towards the end.*


These are the Copic markers I used to color in the hair.

 Here's a pic of what the image looks like with her new hairstyle:


 Next, I altered the dress:


I decided to cut the dress in half to give it a different look.

I then drew in a pair of legs to give the image some height.


And with a few hand drawn embellishments to the dress and shoes, here's what the image looks like now that it's complete.


With just a few small changes, I was able to alter the look of the image from the original.
This is a great way to get the most use out of your digital images.
Now, I can add this image to any card or project.

   And, as promised, here's a list of colors I used:
-Skin- E11, E13,  R20
-Hair- E13, E15, E29
-Dress- Y00, Y13, Y18, R27, E74

As a final touch, I added some polka dots and Diamond Stickles.

And ta-da! Image complete! :)


I hope you enjoyed this tutorial for today!
Thanks for stopping by and enjoy the rest of your day! :)


Post edited by: Shyann Martinez


Pin It Button