Pages

Sunday, January 31, 2016

"Birthday Wishes" Card: Glitter N Sparkle "Embossing" Challenge!!

Hey everyone, happy Sunday to you all!! I hope you all had a wonderful day! For today's post I bring you another great challenge from the Glitter N Sparkle blog. The theme for this week's challenge is "Embossing," so you can either dry or heat emboss; or combine the two to make your project.
Whichever you chose to do, make sure to leave a link to your creations for your chance to be one of three winners to receive a prize from our sponsors.
And, our fabulous sponsors for this week are:
-

-
AND


Our sponsors graciously gave the DT members a chance to play around with their fabulous digis, and the card I'm featuring today uses an image from the Lacy Sunshine shop.

Here's the pic for you to check out:


The adorable image is "Rory loves Unicorns".
I created a "Shadow Box" card using a tutorial I found on my Pinterest board.
Here's the link to the tutorial here:


I used a sheet of patterned paper from a Heidi Swapp "Serendipity" 12" x 12" paper pad as the base.
Next I added a coordinating light pink card stock that I embossed with a Darice embossing folder, and I adhered it to the back to create a background.
I then drew a window, cut it out, colored in the panes, added a window frame, and a lace curtain.
I wanted to recreate the look of a girl's bedroom.
I added a few posters to her wall using three pieces of white card stock I cut down to 1" x 1 1/2".
Finally, I made all the posters in the room using heat embossing for the sentiments, hand drawn elements and unicorn stickers and arranged and adhered them to the background.


For the image, I used my alcohol markers to color her in.
Here's a rundown of the colors I used:
-Skin- FS9, Beige, R20
-Hair- E29, E74, E79
-Clothes- C06, C07, C08, B12, B14, B18, V20, V24, R14, R17, G40, G43
-Unicorn Hat- RV000, RV52

I fussy cut the image out, went around the edges using a black marker, and adhered it to the shadow box.


To finish the card off, I added a few platinum sequins, Recollections flowers, another unicorn sticker and the sentiment.


And ta-da!! Card complete!!


I hope you enjoyed this card for today!!
Thanks for stopping by, enjoy the rest of your Sunday, and as always, peace!! :)


Post edited by: Shyann Martinez

Friday, January 29, 2016

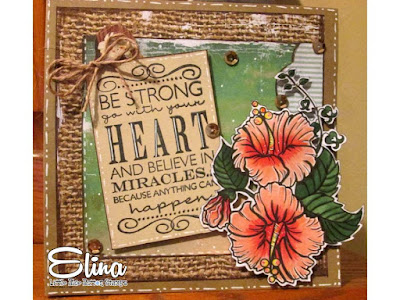
"Be Strong" Inspirational Card featuring Little Blue Button Stamps!!

Hey everyone, happy T.G.I.F to you all!! I hope your Friday is off to a great start!! For today's post, I have a Design Team card I created for the Little Blue Button Stamps blog!! They are celebrating the release of their newest images, so make sure to swing by the shop to check them out. The card I'm featuring uses the "Hawaii Flower" digi, which is a gorgeous image depicting a Hibiscus. This was a fun image to color and I have a full tutorial on my channel for you to check out.                                                                    
                                                                 You'll find the video here:


                                               Here are some close up pics for you to check out:
     

The card base measures 5 1/2' x 5 1/2" & is made using a sheet of craft card stock.
For the patterned papers, I used a KaiserCraft 6 1/2" "Paradiso" paper pad.
I used a Stampabilities stamp on a piece of Neenah "Desert Storm" card stock for the sentiment.

Next, I moved on to the image and here's a rundown of the colors I used:
-Flowers- E95, RV14, R27
-Leaves- G46, G28, E74


First, I fussy cut the image out leaving a white border.
I added some sparkle with my Wink of Stella Glitter Brush marker and shine with my Glossy Accents.
I then adhered it to the card base using liquid glue and foam adhesive.

To finish the card off, I added a twine bow and gold sequins.

And ta-da!! Card complete!! 


I hope you enjoyed this card for today!!
Thanks for stopping by; enjoy your Friday and as always, peace!! :)


Post edited by: Shyann Martinez


Monday, January 25, 2016

"Happy, Happy Birthday" Pop Up Box Card!!

Hey everyone, I'm back with a Design Team project using the lovely "Penny" for the Jiggery Makery blog!! The card I'm featuring today is a first for me, a "Pop Up Box" card!! I tried making one of these a year or so ago but it it turned out to be a "hot mess". I don't know where I gathered up the courage from, but I was determined to give this design another go. Luckily I found a great tutorial on Splitcoast Stampers that showed me the way.
I'm glad to say that I accomplished my goal and can now check this card off my "Crafter's Bucket List".
I'm not sure if I will attempt another like this but I had fun making this one.
So without further ado, here's the pic for you check out:


I won't go through the measurements for this box; as I'm aware many of you are experts at this design.
I will say that I used a sheet of DCWV  Burgundy card stock for the base.
To decorate the box, I chose this patterned paper from a ColorBok "Rosewood" paper pad.
I used a variety of stamps from Hero Arts, Inkadinkado & Studio G for the sentiments and embellishments.


I drew the presents by hand, cut them out, colored them and added them to the box.


I used a trick I learned from Jennifer McGuire, where you rub Glossy Accents on your baker's twine to stiffen them up & twist them so that they could be added to the balloons.
Make sure to do this before the Glossy Accents dry, so that whatever design you create with the twine will stay in place.


I used my EK Tools Double-Ended Metallic Pens in "Silver" & "Pink" to color in the candles.
For the flames, I used my R14, 404, & Y13 markers.


Next for the cupcakes, I used my Copic markers in RV000, RV63, RV66, RV69, C04, C05, E70, E74, & E79.


I used my alcohol markers to color "Penny" in.
Here's a quick rundown of the colors I used:
-Skin- TN1, FS9, R20
-Hair- E70, E74, E79
-Dress- RV63, RV66, RV69, C06, C07, C08


As a finishing touch, I added some sparkle using my Wink of Stella Clear Glitter Brush Marker and shine with my Glossy Accents.

And ta-da!! Card complete!! 


I hope you enjoyed this project for today, and have inspired you to re-visit old card designs you haven't tried.
Thanks for stopping by; enjoy the rest of your day, and as always, peace!! :)


Post edited by: Shyann Martinez

Sunday, January 24, 2016

"Let It Snow": Say it with Music Glitter N Sparkle Challenge!!

Hey everyone, it's Elina here with Challenge #172 for the Glitter N Sparkle blog!!
The theme for this week is "Say it with Music", so let your favorite song inspire you to create a project and share it with us.
We have some great sponsors lined up for this challenge:

They are offering some great prizes for our Top 3 winners.

The Design Team members got a chance to play around with their awesome images and the card I'm featuring today uses an image from Sami Stamps.
Here's the pic for you to check out:


The song that inspired this card was "Let It Snow", which you might consider a Christmas song but if you look at the lyrics it's more about winter than the holidays itself.
So, with that song playing in my head, I set to work on creating the perfect scene for this "Warm Love" digi.
First, I colored in the image using my alcohol markers.
There's a video on my channel showing the step by step coloring process, just click on the video below:


Here's a rundown of the colors I used:
-Skin- TN1, FS9, R20
-Hair- E70, E74, E79
-Coat- E99, E79, E70, E74
-Earmuffs, Scarf, Boots, & Mittens- G40, G43, G46
-Pants & Heart- B12, B14, B18, R17, R27, E74

I used my Gelli Roll White gel pen to add some details to the coat, scarf and boots.
Next, I added some sparkle to the digi with my Wink Of Stella Clear Glitter Brush pen.
I then fussy cut the image and went around the edges using my black marker.
Now it was time to create my background and finish up the card.


I cut a sheet of light blue card stock to 3 7/8" x 6" and stamped a few snowflakes using my VersaMark ink.
I added some white embossing powder and heat set them.
Then, I cut a piece of white card stock to create the look of snow on the ground and adhered it along the bottom.
I added some shading to the snow using my C0 & C04 markers.
Next, I attached the image to the background and added some shadows around it using my BT3 marker.
I also used this same marker to add shading to the snowflakes to make them pop.

To finish it off, I added some die cut snowflakes, blue rhinestones and the sentiment, "Let it Snow".

And ta-da!! Card complete!!


My seven year old daughter wanted to try her hand at creating a card with this image.
Here is her lovely card:


I thought this was so cute and the sentiment reads "A cup of Starbucks can warm a lady's heart!"


I think she did an awesome job on this especially on the image.

I hope you enjoyed these cards for today!!
Thanks for stopping by, and as always, peace!! :)


Post edited by: Shyann Martinez


Saturday, January 23, 2016

Pinterest Inspired Card Series: Part Three: Rolled Roses Valentine!!

Hey everyone, happy Saturday to all!! So far it's been a crazy two days in my neck of the woods here in North Carolina. First, we were hit with an ice storm yesterday that caused a power outage. Luckily after three hours, they were able to restore power. My girls were thrilled when the power went down, they built a fort out of blankets, played games and told stories. But after the first hour and half with no power, it started to dawn on them that no electricity stinks. Without video games, computers, and T.V. to keep them entertained, they were struggling to find new ways to keep busy. But I still have to give them an A for effort because it was not an easy thing to go through. 
But, our power is back on, thankfully, and we are hoping it stays that way.
They are expecting some outages today, with everything frozen over and the temp not going above freezing.
So, I'm scrambling to get a couple of posts and videos done if it does happen.
I think I vented enough and now it's time to move on to the card I created.

If you are a follower of my YouTube channel or not, I have been doing a "Pinterest Inspired" Card series.
I have been pinning a ton of stuff lately and it gave me the idea to use some of those pins as inspiration to create cards.
I like to find ideas when I can and looking to your Pinterest boards is a great way to draw inspiration when you're stuck in a creative rut.

The card I'm featuring today is a take on one of those pins, a wall decor project I found that used canvas, patterned paper, and rolled roses.
And here's the pic of the card I made for you to check out:


The card base measures 5 1/2" x 6" and is made using a sheet of white card stock.
I layered a sheet of patterned paper from a Heidi Swapp "Serendipity" 12" x 12" paper pad on top.
The roses I made by hand using scraps of light pink, dark pink, white and grey card stocks from my stash.
I added some pearls and dash lines to finish it off.

And voila!! Card complete!!


The most tedious part of this card is the rolled roses but the effect you get is so worth the effort.
If you would like to see Part One and Part Two in this series, just click the videos below:


I hope you enjoyed this card for today!!
Thanks for stopping by, enjoy the rest of your day, and as always, peace!! :)

I'll be entering this card into the 
Cardz TV Card Challenge #1 
"Valentine's Day Card" 


Post edited by: Shyann Martinez

Monday, January 18, 2016

"A Little Love" Valentine's Day Card!!

Hey everyone, I hope you all had a fantastic weekend!! I'm back with another Design Team project for the Jiggery Makery blog!! I created a unique Valentine's Day card featuring the lovely, "Lucy".
I wanted to recreate the look of a newspaper clipping using my alcohol markers, stamps and water coloring.
I also wanted to go with a monochromatic color scheme with a pop of color.
I think I may have achieved the look I was after and I hope you will agree.
Here's the pic for you to check out:


The card base is made from a sheet of black card stock measuring 5 1/2" x 6".
I cut a piece of white card stock to 5 1/4" x 5 3/4" and adhered to the card base as my layer.
I then set it aside to work on the image and background.

For the background I used a sheet of white card stock and stamped a Glitz Design "Laced with Grace" background stamp. 
I used my Staz On Jet Black ink to stamp it.
I then went over the entire sheet with a mix of grey and black water color markers, to mimic the look of newsprint.
Next I added another smaller of sheet of white card stock that I stamped and colored in the same way; to act as my advertisement.
I let the patterned paper dry and went to work on the image.

Here's a rundown of the colors I used:
-Skin- C0, C04, R20, R27, E74
-Hair- C06, C07, C08, R17, R27, E74
Shoes & Heart Banner- R17, R27, E74


I then fussy cut her out and printed the "wanted" letters on the banner.
I set her aside to finish up the "news clipping".
I stamped a few hearts, cupid, and sentiment onto the patterned paper.
Next, I attached my image to the background using foam tape.
I took a pair of decorative scissors and cut around the edges.

I then attached the whole panel, which measures 4 7/8" x 5 1/2", to the base using foam tape.
I added a few red hearts and a couple of seals along the bottom to finish up the card.
Lastly, I went around the images using my C02 marker to add some shading.

And ta-da!! Card complete!!


I hope you enjoyed this project for today!!
Thanks for stopping by; enjoy the rest of your day, and as always, peace!! :)


Post edited by: Shyann Martinez

Sunday, January 17, 2016

"Sending my Love": Glitter N Sparkle Monochrome Challenge!!

Hey everyone, happy Sunday to you all!! I hope you are having a relaxing day! It's that time again for another great challenge over at the Glitter N Sparkle Challenge Blog!! This time the theme is "Monochrome".
Make sure to play along and share with us all your monochromatic creations!
We have some great sponsors lined up for this challenge:


They are graciously offering prize packs to our top 3 winners, so please make sure to link your projects for you chance to win.
The Design Team members were lucky enough to get to play with a few images from our sponsors.
The card I'm featuring today is a lovely digi from the Ppinky Dolls shop.
Here's the pic for you to check out:


The card base is made from a sheet of pink card stock and measures 4" x 5 1/2".
The image featured is the "Mr Egg - Easter Egg" digi from the Ppinky Dolls shop.
Now to pick a monochromatic color scheme for this image was a challenge.
I played around with a few different combos such as; black & white, grey & white, tan & white, etc.
But I kept coming back to a pink & white color combo.
The trick was to use my Copic markers in softer shades of pink that would compliment each other.
I wanted to avoid creating a neon pink color scheme.
So I grabbed all my pink markers and created a color swatch to test out which colors would blend well together.
Once I was satisfied with my marker choices, I preceded to color the image in.

Here's a rundown of the colors I used:
- Skin- RV000, RV52
-Hair- RV52, RV63, RV55
-Dress- RV63, RV55, C04, C0
-Bow, Basket & Mr. Egg- RV52, RV63, RV55, RV000, 
- Hillside, Background, & Flowers- C04, C0, RV000, RV52, RV55, RV63


Once I had the image filled in, I trimmed the panel to 2 7/8" x 5".
I stamped a few hearts and the sentiment, "Sending my Love" in Memento Tuxedo Black ink.
Next, I layered the image panel on a sheet of grey card stock cut at 3 1/8" x 5 1/8".
I backed the entire piece on a sheet of white card stock cut at 3 1/4" x 5 1/4".

I used foam tape to attach the image panel to the card base.
To finish it off, I wrapped some grey jute cord along the front and added a few Recollections flowers.

And voila!! Card complete!!


I hope you enjoyed this project for today!!
Thanks for stopping by; enjoy the rest of your Sunday, and as always, peace!! :)


Post edited by: Shyann Martinez

Friday, January 15, 2016

"You Are My Anchor" Inspirational Card!! :)

Hey everyone, happy T.G.I.F to you all!! It's Elina here with another great Card Sketch challenge for the Feeling Sketchy blog!
Here's the pic of Card Sketch # 137:


Make sure to head over to the Feeling sketchy blog to play along.
And as always ,we have a great sponsor for this challenge: DeeDee's Digitals, offering a great prize pack to our winner.
Please make sure to check out our DT members projects based on this sketch and with that said, here's the pic for the card I created:


The card base is made from a sheet of craft card stock and measures 5" x 5 1/2".
This card was very easy to make, as there is no stamping and only a little bit of coloring.
The patterned papers I used are from an old Graphic 45 "By The Sea" 12" x 12" paper pad.
I inked & distressed the edges of my papers before adding them to the card base.
I used this cut apart from the paper pad as the main image and sentiment.
Then, I added some shading to the image and letters using my C04 & C0 markers.


I added a few highlights with my white gel pen and a few vintage sticker flags along the top.
Next, I wrapped some jute cord around the image and patterned card stock layer.
 I tied it in a bow and cut a few seashells from another paper in the pad and added them along the bottom.

To finish the card off, I added a few pearls from a Recollections pack.

And ta-da!! Card complete!!


I hope you enjoyed this project for today!!
This is a great way to use your larger 12" x 12" paper pads to create a unique card.
Thanks for stopping by; enjoy the rest of your Friday, and as always, peace!! :)


Post edited by: Shyann Martinez
"Snowball Fight" Challenge: Scrap N Dipity Design Team Card!! :)

Hey everyone, happy Friday to you all!! I have some exciting news- I am the newest member of the Scrap N Dipity Design Team!! I'm so honored to be a part of this team and Alisha's latest images are too cute! I can't wait to be able to share new projects featuring her awesome designs. As you may already be aware, this is my second post for today, so, if you haven't seen my first post, please be on the look out for that as well! Now, for this post, I have a card and video tutorial to share with you all.
The card I'm featuring is my first card as a part of the new DT. 
Alisha is sponsoring a "Snowball Fight" challenge up on the Scrap N Challenge blog!
For those participating in the event, Alisha will be offering this lil' cutie, Tanya- Snowball Fighter, as a freebie.
We would love to see your takes on this image and the challenge, so make sure to play along.
Here are the Challenge Rules:

  1. You can create anything you like, but it must include the Snowball Fighter image.
  2. When complete you need to add your blog post to the Inlinkz (also below this post) by February 14th 11:58pm EST.
  3. When you create your blog post to showcase your project please do mention this post and link back to the challenge blog.
  4. You are welcome to combine this challenge with another,
  5. One entry allowed for this challenge.
  6. Have fun!
There is also a video tutorial taking you step by step through the coloring process, just click on the video below.


So without further ado, here's the pic for you to check out:


The card base is made from a sheet of dark blue card stock and measures 5 1/2" x 5 3/4".
I created the look of a frame to house all my elements such as the trees(cut from patterned and dark green card stocks) and snowy hills(cut from white card stock).
Next, I added a layer of vellum to soften the background and stamped a few snowflakes on the background and vellum.
I colored in the "Tanya Snowball-Fighter" image from the shop and this snowman image using my alcohol markers.

Here's the video that shows you the coloring process:


Lastly, I added my sentiment, "Winter brings out the kid in us all".

And voila!! Card complete!!


I hope you enjoyed this project today!!
Thanks for stopping by, enjoy the rest of your Friday, and as always, peace!! :)


Post edited by: Shyann Martinez

Monday, January 11, 2016

Queen Of Hearts Valentine's Day Card!!

Hey everyone, it's Elina here with my Design Team card for 2016 for the Jiggery Makery blog!! We had our choice of images to work with, so I chose the Princess image for my project today. I decided to turn her into the "Queen Of Hearts," and create a Valentine's Day card.
 I drew in some hearts on her dress, added a crown and created a cool background to show off her Royal Highness.
                                                       Here's the pic for you to check out:


The card base is made of a sheet of black card stock and measures 4 1/2" x 6".
I used an old Avery Elle Sending You stamp set and my Stampin Up white pigment ink to create a custom pattern on the black card stock.
For the image, I first drew in the hearts and then colored her in using my alcohol markers.
Here's a rundown of the colors I used:
- Skin- TN1, FS9, R20
- Hair- E70, E74, E79, R17, R27
- Dress & Hearts- C06, C07, C08, R17, R27

Once my coloring was complete, I trimmed down the card stock to 3 1/2" x 5" and rounded the corners.
To replicate the look of a playing card, I drew hearts in the corners and colored it in using R17, R27 Copic markers.
Next, I stamped a "Q" over the hearts and then outlined the card using a black marker and my Spica Gold pen.
Then I stamped the "Be Mine" sentiment along the top.


I  added a few more playing cards behind the main image panel, and used foam tape to adhere it down on the card base.

To finish it off, I added an Anna Griffin Decorative Sticker, some Prima flowers, and a few red and gold sequins.

And ta-da!! Card complete!!


I hope you enjoyed this project for today!!
Adele has been working on some new images, and I hope to be able to share those with you soon.
Thanks for stopping by; enjoy the rest of your day, and as always, peace!! :)


Post edited by: Shyann Martinez

Sunday, January 10, 2016

Tic-Tac-Toe Challenge!!

Hey everyone, it's Elina here with a card I created for the newest challenge on the Glitter N Sparkle Challenge blog. 
This is the "Tic-Tac-Toe," Challenge #170.
It's a fun, unique idea in which you make a selection of the items you can use to create the card; either horizontally, vertically, or straight across a la tic-tac-toe style and incorporate the choices you picked to make your project.
Make sure to click on the highlighted "Glitter N Sparkle Challenge" to check out the choices listed on our Tic-Tac-Toe board and play along.
As always we have some great sponsors lined up:

For the card I'm featuring today, I made my selection straight across the middle to include: Gems or Pearls", Digital Images, and "Ribbon or Lace".
Here's the pic for you to check out:


The card base is made form a sheet of craft card stock and measures 4 1/2" x 6 1/4".
I stamped a pattern on the craft using a Hampton Art, Graphic 45, "Harlequin Script" stamp, and Stampin Up White pigment ink.
I set it aside to work on the image.

For the image I used this gorgeous one, "Marie Antoinette - Cupcakes in Beehive Hair from SLS Lines.
I went with a pale skin tone, lots of rouge on the cheeks, ruby red lips and a powdered wig to tie it all together.
Here's a list of the colors I used:
- Skin- TN1, FS9, R20, R27, RV69
- Hair- BT1, IG3, C04
- Cupcakes, Flowers, and Ribbon- RV52, RV55, V22, VV35, Y00, Y13, RV69, E74


First I added some Wink Of Stella to her wig and a beauty mark to her cheek.
I fussy cut the image out and used my black marker to go around the edges.
I then took a Heidi Swapp resist tag and water colored it, using my Tan and Brown Recollections markers.
To darken the edges a bit, I went in with my Dark Brown marker.
I used my heat tool to dry the tag and adhered my image to it.
Then I added some colored, adhesive gems to the cupcakes, flowers, and her earrings.
I added a piece of blue lace with coordinating blue gems along her neckline.

Next, I cut a patterned paper from the "Something Blue," by Prima, 6" x 6" paper pad; inked and rounded the edges, and attached it to my card base.
I then used some foam tape to attach my image panel to the card layer.
All that was left to do now was to add my embellishments.

I embellished the front of my card by adding a few fleur de lis resin pieces and some acrylic heart buttons to the corners.
I colored them in using my Gold Metallic Recollections marker.
To Marie's wig I added a resin crown that I colored in using the same Gold marker.
To finish it off, I added a Recollections Gold pin and the sentiment, "Eat Your Cupcake" from a Hero Arts stamp set.

And voila!! Card complete!!


I hope you enjoyed this card for today!!
Thanks for stopping in, enjoy your Sunday, and as always, peace!! :)


Post Edited by: Shyann Martinez


Pin It Button