Pages

Sunday, May 29, 2016

"Flowers brighten your day" featuring Bugaboo Stamps

Hey everyone, happy Sunday to you all! I hope you all are enjoying your holiday weekend! For today's post, I have a card I made for the latest challenge over at the Glitter N Sparkle blog. The theme for this week is "Flower Power," so please make sure to stop by the blog if you want to play along. We want to see all your fabulous "Flower Power" themed crafts.
  We have some great sponsors lined up for this challenge:


- A Day for Daisies
-Bugaboo  Stamps
-Ike's Art

Here's the pic of the card I created using the "If friends were flowers" digi from Bugaboo Stamps.

 The card measures 4" x 4 1/2," and uses a sheet of white card stock as the base. I added some dash lines along the edges of the base with a fine tip black marker.  Next, I set it aside to work on the image.

As always, I used my alcohol markers to bring this image to life.
Here's the colors I used:

-Flowers- RV000, RV52, RV55
-Stems- YG03, G43
-Background- B00, B12, C0, C01

I only colored one half of the image, opting to re-create a torn edge on the other side with my C markers. I added a shadow along the torn edge with my B12 marker and a  highlight with my white gel pen. I attached it to a piece of light blue card stock that I cut with some deckle edged scissors.
I then used pop dots to adhere it to the card base.

As a finishing touch, I added a few pink sequins.

And ta-da! Card complete!


                                                  I hope you all enjoyed this card for today!
                                                 Thanks for stopping by, and have great day!

                                                        Post edited by: Shyann Martinez

Friday, May 27, 2016

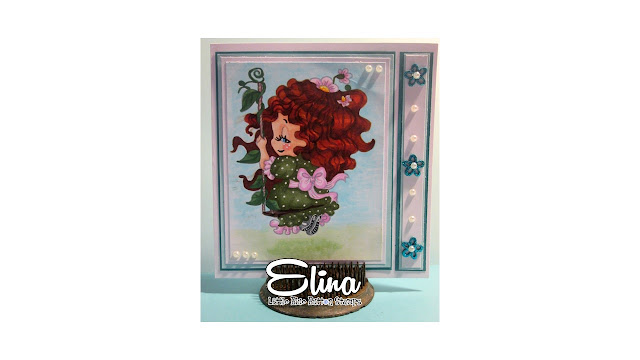
"Swingin by to say Hi!": LBBS New Stamp Release!

Hey everyone, happy T.G.I.F to you all! I hope you are all ready to enjoy your Memorial Day weekend! And, what better way to kick off the start of the holiday weekend than with a new stamp release from the LBBS?! Olga has some beautiful new digis that were released and today's card features one of her lovely creations. Please make sure to head over to the Little Blue Button Stamps shop to check them out.
                                  
                                   Without further ado, here's a pic of the card for you to check out:
The card measures 5 1/2" x 5 7/8," using a sheet of white card stock as the base. For the card layers, I used sheets of dark and light blue card stock that I trimmed down and adhered to the card base using my tape runner. (The measurement for the dark blue card stock is  4 3/8" x 5 3/8," and the light blue card stock at 4 1/4" x 5 1/4". )

I then set the base aside to work on the image.

The image I used is "Swingin' By" from Olga's newest release. This is an adorable image with lots of flowing hair to color.

Here's a rundown of the colors I used to bring this cutie to life:
-Skin- E00, E11, R20
-Hair- E97, E99, E29
-Dress & Flowers- G94, G99, RV000, RV52
-Swing- E70, E74, E79

 For the background, I colored the sky in using my B00 Copic marker, and I softened the look by going over it using my 0 Colorless Blender marker. I used my G40 marker for the grass and again softened the look with my 0 Colorless Blender. I added a shadow below the girl using my G43 marker and then blended it out with both my G40  and 0 markers.

Next, I trimmed the image panel down to 3 7/8" x 4 7/8", backed on a piece of white card stock, and adhered it to the card.

I added a smaller panel next to the image layering dark blue, light blue, and white card stocks. I also used three small flower buttons and pearls from my stash to embellish it.

To finish the card off, I added a few pearls here and there.

And voila! Card complete!
I hope you enjoyed this card for today!
Thanks for stopping by, and have a great Memorial Day weekend!


Post edited by: Shyann Martinez

Wednesday, May 25, 2016

Copics, Drawing and Images, Oh My!

Hey everyone, happy "Hump" day to you all! I hope your Wednesday is off to a great start! Today's post is a special one for me. For the past few weeks, I have been busy drawing up a storm and working on creating my own images. If your a follower of my blog, you know that I often add my own spin to digital images. From drawing backgrounds to altering the outfits. I enjoy drawing in these kind of things from time to time and I thought it was time to draw my hand at creating my own images. The card I'm featuring today showcases an image and background I drew myself. I have a few more that I am currently working on and I hope to able to share those soon.
Just a quick note: This card is part of the newest "Anything Goes" challenge over at the Decorate to Celebrate blog. Make sure to head over to the blog to play along. We love seeing your crafty creations.

                                                       Here's the pic for you to check out:
                    The card measures 5" x 7" and uses a sheet of white card stock as the base.
                      The background was drawn, scanned into my computer and printed out.
               I wanted to create a boutique backdrop that would work on its own or with images.
I used my alcohol markers to color it in and used a technique to mimic the look of watercolor using Copics.
                                                            Here's the list of colors I used:
                                                -Storefront- G40, G43, C01 C03, C02, C04
                                                  -Glass- B00, E70, 0 Colorless blender

To create the watercolor effect, I used my Colorless Blender solution and my B00 refill solution.
I mixed an equal amount of both solutions in a palette and added it to the background using a paintbrush.

                         After I had the background filled in, I adhered it to the card base using my tape runner.
                                                   Next I began work on the main image.

                  I wanted to draw an image dressed in today's fashions to give her a modern look.
                  So after drawing my image, I scanned her into my computer and printed her out.
                                                               Here's the colors I used:
                                                               -Skin- E00, E11, R20
                                                               -Hair- E70, E74, E79
                                                                -Shirt- RV63, RV55
                                                              -Jeans- B12, B14, B18
                                                -Boots & Purse- E97, E99, E29, G94, G99

              Next, I fussy cut the image and placed her on the background to complete the scene.

As a finishing touch, I wrote the sentiment, "Wishing you a fabulous birthday" as well as the boutique's name "Boutique de Paris".

                                                              And voila! Card complete!

                                                  I hope  you enjoyed this card for today!
                                          I hope to be able to offer this image to you all soon.
                                     Thanks for stopping by and enjoy the rest of your day! :)


Monday, May 23, 2016

"Queen of the Sea" card plus a new Challenge!

Hey everyone, I hope you all had a great weekend! For today's post, I'm sharing a card I made for the latest Glitter N' Sparkle challenge! The theme this week is "Anything Goes," and as always we have some great sponsors lined up:
                                                            
                                                                  -Sparkle N Sprinkle
                                              
                                                              - The Stamping Boutique
                                                         

                                                                      -Lacy Sunshine
                                                         

                                         So, please make sure to head over to the GN'S blog to play along.

           Here's the pic of the card I made using the "Sea Lady" image from Sparkle N Sprinkle:

 The card measures 4 1/4" x 5 1/2" and uses a sheet of white card stock as the base. The card layer is a sheet of light blue card stock that I trimmed to 4" x 5 1.4," and stamped to create a patterned background.
                                             
                     After I put the two layers together, I set the card aside to begin work on the image.

                                                      Here's a rundown of the colors I used:
                                                                
                                                                -Skin- E00, E11, R20
                                   -Shells- Y00, Y13, Y15, RV000, RV52, V20, V25, E95, E70
                      -Dolphins, Starfish, Seahorses- 0, C01, C02, C04, B00, B18, RV66, RV69

 
Once I had all the coloring complete, I added some sparkle using my Wink Of Stella Glitter Brush Pen.

I used a stencil to cut the image panel into the shape you see here. Next, I added it to a scrap piece of white card stock and trimmed it into the shape leaving an 1/8" border all the way around. I then attached it to some dark blue card stock using pop dots.

To add a few finishing touches, I added some platinum sequins, hyacinth flowers from Prima, and a twine bow.

                                                              And ta-da! Card Complete!
                                                    I hope you enjoyed this card for today!
                                 Thanks for stopping by, and enjoy the rest of your evening! :)


 Post edited by: Shyann Martinez


Tuesday, May 17, 2016

Hanging at the Beach featuring "Rose": Jiggery Makery Design Team Project!!

Hey everyone, happy Tuesday to  you all! I'm back once again with a card I created for the Jiggery Makery blog!
                                                  Here's a pic of the card for you to check out:
The card measures 5 1/2" x 5 1/2," and uses a sheet of craft card stock as the base. For my card layer, I used a patterned paper from a KaiserCraft 6 1/2" paper pad that I trimmed to 5 1/4" x 5 1//4."
 Next, I adhered a piece of white card stock that I trimmed down to 5" x 5" onto the patterned paper using my tape runner.With the card base complete, I printed out the image and colored her using my alcohol markers.

Here's a rundown of the colors I used:

-Skin- E00, E11, R20
-Hair- E97, E99, E29
-Swimsuit- G94, G99
Next, I fussy cut the image out and adhered her to the patterned paper from KaiserCraft.
 For the sentiment, "Let's Hang Out!," I used my VersaMark Ink to stamp it and embossed it using white embossing powder from Recollections.
As a finishing touch, I added a few shells from my stash and some jute twine tied in a bow.

 I hope you enjoyed this card for today!
Don't forget to visit the Jiggery Makery Etsy shop to purchase this image.
Thanks for stopping by, and enjoy the rest of your evening! :)


Post edited by: Shyann Martinez


Sunday, May 15, 2016

Couture Mannequins Trio: GNS "Ribbon and/or Lace Challenge!!


Hey everyone; happy Sunday to you all! Today's post features a card I created for the latest challenge over at the Glitter N' Sparkle Challenge blog. The theme is "Ribbon and/or Lace". Please make sure to head over to the blog to play along and, as always, we have some great sponsors lined up for this challenge, including:


                                                                   -Pattie's Creations


Here's the card I made using the "Vintage Mannequin Trio" from Pattie's Creations


The card measures 4 7/8" x 4 7/8," and uses a sheet of light blue card stock as the base. On top of that layer, I added a layer of black card stock that I trimmed down to 4 3/4"  4 3/4." Next, I printed out the image and used my alcohol markers to color them in.

Here's a rundown of the colors I used:

-E00, E11, E70, E74, E79, Sandstone, Maple,  Gold gel pen

After the coloring was done, I trimmed the image panel to 4 1/2" x 4 1/2." I used a flower and some lace from my stash to fashion some dresses for these mannequins. Next, I used some twine tied in a bow to add a finishing touch.

For the background, I used my B00 and Colorless Blender Copic markers to create a water colored look. It's a pretty simple and cool technique, and you can find a video on achieving this look on my channel.

And voila!! Card complete!!

                                                      I hope you all enjoyed this card for today!
                              Just a reminder that you can find me on Instagram, just click the link, https://www.instagram.com.      /elinapereira63\ to stay updated on my latest projects.
                                   

                                   Thanks for stopping by, and enjoy the rest of your Sunday!! :)


Post edited by: Shyann Martinez

Monday, May 9, 2016

"Coffee for the Best Moments in Life" !!

Hi everyone, I'm back once again with a project I created for the Little Blue Button Stamps blog. Today is "Crafty Monday," over at the LBBS blog, so please make sure to check out the other DT projects featuring this awesome "Some Coffee"image from the shop.
                                                 
                                               Here's a pic of my project for you to check out:
Instead of creating a card, I opted to create a mixed media wall decor piece to hang in my craft room. The base of this piece is a 5 3/4" x 5 3/4" woodblock that I got from hubby. I covered the front and sides of the block using papers from a Prima 6' x 6', "Epiphany" paper pad. I adhered it to the woodblock using some Ranger Multi Medium Matte gel.
Once dry, I stamped a few images from a Prima stamp set on the background, and for the edges, I used a black Faber-Castell Big Brush marker to go around the edges of the piece. With the background complete, I set it aside to work on the images. 

I used my alcohol markers to color these ladies in, and here's a rundown of the colors I used:

-Skin- E00, E11, E13, R20
-Hair- Y13, Y15, E13, E18, E29, E79
-Dresses &Shoes- B00, B12, B14, RV66, RV55, RV69, CG01, CG04, E15, E18
-Bags-  B12, B14, RV63, RV55, RV66, RV69, G40, G43
 -Coffee Cups- 0, CG01, E70, E74
Next, I cut the images out and added them to the background. I went around the edges using a water color black marker from Recollections, making sure to smudge the color a bit.

I added the "Coffee," sentiment using stickers from Pebbles Inc., "ABC's" set. To finish it off, I  adhered a few coffee beans and spoons in the corners.

                                                      And ta-da! Wall piece complete!

                                                 I hope you all enjoyed this project for today!
                                           Thanks for stopping by, and have a great evening!


Post edited by: Shyann Martinez


I need a "Beach Getaway w/ the Girls"- featuring All Dressed Up Stamps!!

Hi everyone, I hope you all had a wonderful Mother's Day! I apologize for being M.I.A over the past couple of weeks. It has been crazy on my end, crafting u a storm in preparation for my first ever craft fair. Yikes! But I survived and I will share my experience with you later o this week. So with making things fir the fair and design team projects, unfortunately, posting it on my blog had to take a backseat. 
So I hope o be able to feature these projects in future posts soon.
Well with that said, it's time to share the card I created for the latest challenge over at the Glitter N Sparkle blog.
The theme this week is "One for the Girls", so make sure to head over to the Glitter N Sparkle Challenge blog to play along.
Here's the list of the wonderful sponsors for this challenge:


                                                                       -Oddball Art


And here's the pic of the card I made using the "3 Little Summer Girls" from All Dressed Up:

                  The card measures 4 1/4" x 6" and uses a sheet of craft  card stock as the base.
For the card layer I used this patterned paper from a KaiserCraft 6 1/2" paper pad called "Paradiso"
         I trimmed it down to 4" x 6 1/4" and adhered it to the card base using my tape runner.
                     Next I worked on the images, coloring them in using my alcohol markers.

                                                           Here's the list of colors I used:
                                                   -Skin- E00, E11, E13, E15, R20, RV14
                                   -Hair- Y00, Y13, Y15, E13, E18, E29, E15, E18, E29
                                  -Clothes- B00, B12, B14, Y13, Y15, E13, RV63, RV55

 
             I cut each of the girls out and arranged them on the background before adhering them.
                 I added some polka dots and highlights to their outfits with my white gel pen.
      If you take a close look at the image, you'll spot that one of the girls is wearing tube socks.
                                                                  Tube socks at the beach?!
 I usually color in front of the TV and I must of missed this cause I didn't catch it till it was on the card. So I decided to keep it instead of coloring another one. After all, card making is a handmade art form.


                  To finish the card, I added some Tim Holtz rub-on transfers to the background.
                                   I also used them o create the sentiment along the front.
            "Collect beautiful moments, embrace the journey and go where your heart takes you".
              As a final finishing touch I wrapped jute cord along the bottom and tied it in a bow.

                                                             And voila! Card complete!!


                                                    I hope you enjoyed this card for today!
                                          Thanks for stopping by and have a great day!! :)


Pin It Button