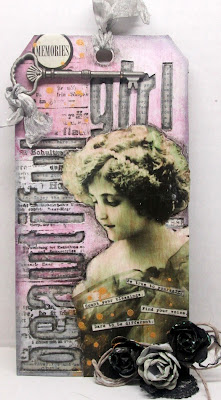
I followed the steps, used materials from my stash, and took shortcuts where needed to create this tag.
Here's the pic for you to check out:
I used a 3 1/8" x 6 1/4" Chipboard tag.
I primed it using two coats of gesso, allowing it to dry in between applications.
Next, I brushed on a coat of Mod Podge (in the place of Multi-Medium) over the entire surface.
To add color to the background, I used Distress Paints in "Picked Raspberry" and "Weathered Wood".
Now this next part is where I had to get creative.
In the tutorial, Tim used some word dies for his tag.
Unfortunately, my metal die collection is small but I wanted to achieve the same effect.
So I went searching through my stash to see what I could come up with.
Luckily, I found a set of Heidi Swapp Chipboard Alphas that hubby got for me.
I thought these would be the perfect alternative to metal dies.
So with the Alphas in hand, I arranged them on the tag, traced them, and cut them out using my Xacto blade.
I adhered a patterned paper from the Teresa Collins "Vintage Finds" 6" x 6" paper pad behind the letters.
I added a thin coat of gesso to each of the letters and outlined them using a Recollections Black water color marker.
Next, I stamped a text background using a Glitz Design "Laced with Grace" stamp set.
I then adhered my vintage photo using Mod Podge.
I added some shadows using a black water color marker and smudging the edges.
I used the Teresa Collins paper pad to cut out these tiny phrases and added them to the photo.
To finish the tag off, I added a few embellishments, like, the key, roses, twine bow and scrap of black lace.
Lastly, I tied some Tim Holtz Crinkle Ribbon on the tag and key.
And voila!! Tag complete!!
I hope you enjoyed this project for today!!
Thanks for stopping by, enjoy the rest of your day and Peace!! :)


No comments:
Post a Comment