Pages

Tuesday, September 1, 2015

Quick and Easy Miss You Card using Dear Lizzy Paper Pack!!

Hey Everyone!! Happy Tuesday to all!! I'm back with another great Card Sketch challenge for the Feeling Sketchy blog!
                                                     Here's the pic for Card Sketch #128:


                                 Our sponsor for this challenge is the awesome; DeeDee's Digis.
                                 They are offering a great prize pack for the winner of this challenge.
                                 So make sure to head over to the Feeling Sketchy Blog to play along and check                                    out all the wonderful cards created by the DT members.


                                    Here's the pic of the card I created based on this sketch:


The card measures 4 1/2" x 5 1/2".
All of the papers used for this card came from the American Crafts, Dear Lizzy "5th and Frolic," 12" x 12" paper pad.
                               I used a sheet of teal patterned paper from the pad as my card base.
For the main image panel, I chose this neutral polka dot paper, trimming it down to 4 1/2" x 5 1/4".
I added a teal strip along the bottom and inked the edges in Chocolate Chip ink from Stampin Up.
Instead of adding ribbon as per the sketch, I wrapped some gold thread around the front of the card.

Next, I fussy cut these Polaroid frames, and stamped the sentiment "You're Never More Than a Thought Away," hearts, and dash lines.
I then inked the edges and adhered them down using my tape runner.
I also fussy cut this house from one of the patterned papers and colored it in using alcohol markers.
I used foam tape to adhere it to the front.


To finish the card off, I added a few gold sequins.

And voila!! Card complete!!


I hope you enjoyed this card for today!!
Thanks for stopping by, enjoy the rest of your day and Peace!! :)


Monday, August 31, 2015

"Love" Card!!

Hey Everyone!! I hope you are having a great start to your week! For today's post, I have a Design Team project for the Jiggery Makery blog. I made a quick and easy card using the lovely, "Victoria" digi, which you can find in the Etsy shop by clicking the link, etsy.com/shop/JiggeryMakery.

                                                      Here's the pic for you to check out:


                                                   The card measures 4 1/2" x 5 1/2".
For the background, I stamped a few doilies and a decorative border onto vellum.
I cut the pieces out, arranged them on the card, and used my tape runner to adhere them down.
The doily and border image came from a Recollections "Craft It Valentine" stamp set.
Next, I added a piece of black lace trim along the bottom and then set it aside to work on the image.


                    I printed the image out and colored her in using my alcohol markers.
                                            Here's a rundown of the colors I used:
                                                      - Skin- FS5, FS7, R20
                               - Hair- TN7, TN8, 721 (Artist Loft Marker Brand, "Light Brown")
                                             - Dress- C06, C08, 302, 531, BT3


I added a decorative pattern to the bottom of the dress and traced over it using my black Spica pen to make it sparkle.
I used Glossy Accents on the gloves, sash, and bodice trim.
I adhered a strip of black lace trim along the bottom to complete the look.
Next, I cut the image out and used foam tape to adhere it to the card base.

I finished the card off, by adding a few pearls and the "Love" sentiment.

                                                          And voila!! Card complete!!


                                              I hope you enjoyed this project for today!!
                           Thanks for stopping by, enjoy the rest of your day, and Peace!! :)


Friday, August 28, 2015

Beautiful Girl Mixed Media Tag: 12 Tags of 2015 Entry

Hey Everyone!! Happy T.G.I.F to you all!! For today's post, I created a tag for the 12 Tags of 2015 challenge over at Tim Holtz's blog. I've seen a number of crafters participating in this challenge and thought I would give it a try. What I discovered is that with each challenge theme, there's a tutorial that goes along with it. Tim goes through each step of the process and as always, the end result is stunning.
I followed the steps, used materials from my stash, and took shortcuts where needed to create this tag.

                                                       Here's the pic for you to check out:


I used a 3 1/8" x 6 1/4" Chipboard tag.
I primed it using two coats of gesso, allowing it to dry in between applications.
Next, I brushed on a coat of Mod Podge (in the place of Multi-Medium) over the entire surface.
To add color to the background, I used Distress Paints in "Picked Raspberry" and "Weathered Wood".
Now this next part is where I had to get creative.
In the tutorial, Tim used some word dies for his tag.
Unfortunately, my metal die collection is small but I wanted to achieve the same effect.
So I went searching through my stash to see what I could come up with.
Luckily, I found a set of  Heidi Swapp Chipboard Alphas that hubby got for me.
I thought these would be the perfect alternative to metal dies.
So with the Alphas in hand, I arranged them on the tag, traced them, and cut them out using my Xacto blade.

I adhered a patterned paper from the Teresa Collins "Vintage Finds" 6" x 6" paper pad behind the letters.
I added a thin coat of gesso to each of the letters and outlined them using a Recollections Black water color marker.
Next, I stamped a text background using a Glitz Design "Laced with Grace" stamp set.
I then adhered my vintage photo using Mod Podge.
I added some shadows using a black water color marker and smudging the edges.

I used the Teresa Collins paper pad to cut out these tiny phrases and added them to the photo.
To finish the tag off, I added a few embellishments, like, the key, roses, twine bow and scrap of black lace.
Lastly, I tied some Tim Holtz Crinkle Ribbon on the tag and key.

And voila!! Tag complete!!


I hope you enjoyed this project for today!!
Thanks for stopping by, enjoy the rest of your day and Peace!! :)


Monday, August 24, 2015

"Let The Good Times Roll!" Birthday Card!!

Hey Everyone!! I hope you all had an enjoyable weekend!! For today's post, I have a Design Team project for the Jiggery Makery blog. I used the lovely "Valerie" digi and some Heidi Swapp "Serendipity" papers to create a bright, cheerful birthday card.
                                                        Here's the pic for you to check out:


The card measures 5" x 5 1/2".
I cut a 1 1/2" strip of patterned paper from the collection and adhered it to the card base.
I added stitching lines with my white gel pen and Glossy Accents to make the colorful stripes pop.
Next, I cut 3 1/2" x 4" square from the same paper and adhered it at an angle.
I repeated the same steps to highlight the stripes and set it side to work on the image.

For the image, I kept the coloring fairly simple.
Here's a rundown of the colors I used:
-Skin- FS7, FS9, CR3
-Hair- TN7, TN8, EB5
-Top and Shoes- CR3, PP2
-Shorts- BGR2, BT3


I used my Colorless Blender marker to add pin striping on the shorts and polka dots on the shoes.
Next, I went in with a silver marker to fill in the lenses.
I fussy cut the image and added Glossy Accents to the glasses and shoes.
Then I set it aside and gathered the elements I needed to complete the card.

I cut this Polaroid frame from the paper collection, added the image and used foam tape to adhere it down.
The sentiment "Let The Good Times Roll" was created using alphas from the "Serendipity" collection.
To finish the card, I added a few iridescent sequins.

Normally, this is where I end the post with a ta-da! or voila!.
But not today. 
Why you may ask?
 Because I actually stamped the inside of the card as well.
I usually don't show pics of the inside because I fill them in as I need them.
Which I'm sure a lot of crafters do as well, or at least I hope I'm not the only one?!
But enough about that, here's the pic for you to check out:


I used a Fiskars "Birthday Type" stamp set (that I cut apart) and Memento Tuxedo Black ink to create the sentiment.
I colored in the words "Big" and 'Enjoy" using my CR3 and PP2 markers.
I then coated them with a thin layer of Glossy Accents to make them stand out.

And ta-da!! Card complete!!


I hope you enjoyed this project for today!!
Thanks for stopping by, enjoy the rest of your day, and Peace!! :)


If you would like to purchase the image featured in today's project, head over to the Jiggery Makery Etsy shop by clicking the link: etsy.com/shop/JiggeryMakery.


Saturday, August 22, 2015

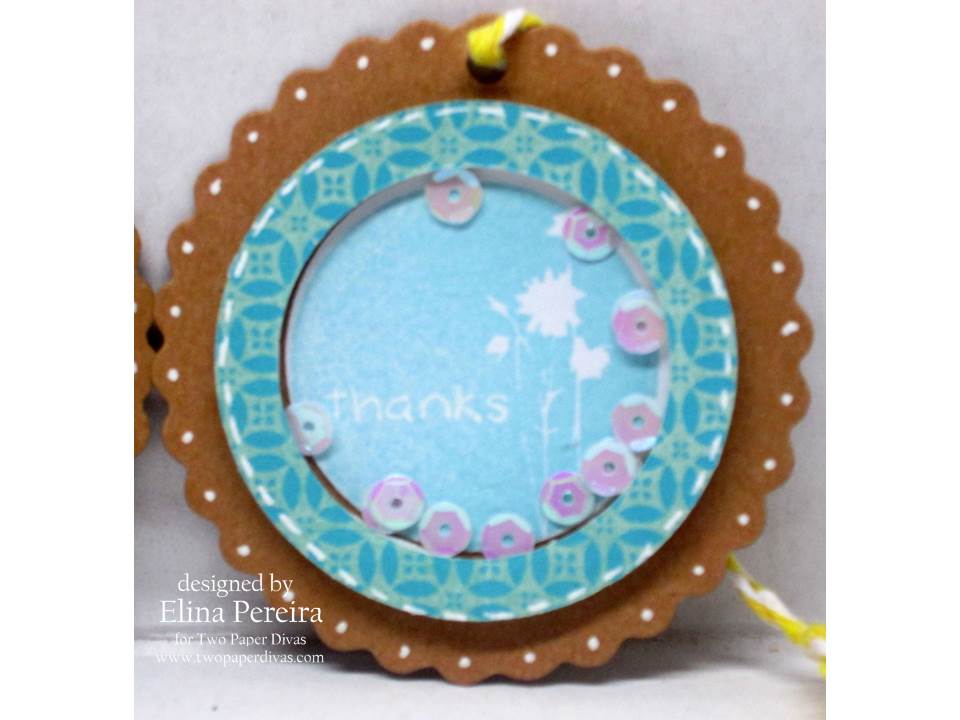
Quick and Easy Shaker Tags!!

Hey Everyone!! Happy Saturday to you all!! I hope you are enjoying your weekend thus far. For today's post, I have a few shaker tags I made using the "Silhouette Circles" stamp set from The Two Paper Divas.
This stamp set was part of the new release for August, and if you missed the sets that were released head over to the Two Paper Divas blog to check them out.
                                                     
                                                        Here's the pic for you to check out:


In this project, I used a set of scalloped tags I purchased at my local dollar store.
I stamped the "Silhouette Circles" on white card stock using Stampabilities Pigment Inks; in "Light Green", "Baby Blue", Royal Blue" and "Lime Green".


I die cut the circles using my Cuttlebug and Darice Nesting Circles die set.

Next, I adhered the circles to the tags using my tape runner.
I die cut a few circle frames from a DCWV Violet Stack paper pad  and acetate to create my shaker elements.
I added sequins to each of the circles and used two thicknesses of foam tape to attach it all together.

I then added a few details using a white gel pen to finish up the tags.

                                                       And ta-da!! Tags complete!!


I hope you enjoyed this project for today! Thanks for stopping by, enjoy the rest of your weekend, and peace!! :)


Monday, August 17, 2015

You're always So Sweet! Quick and Easy Card!!

Hey Everyone!! I hope you all had a great weekend!! For today's post, I have another Design Team project for the Jiggery Makery blog. I used this lovely image for my project, which you can purchase at the Jiggery Makery Etsy shop.
This image is perfect for practicing different skin tones and hair colors. I previously made an ATC card using this same image and you can click the link here:http://scrapbookscraftscards.blogspot.com/2015/04/first-atc-card.html to view this project.
I decided to make a quick and easy card with this image using some older supplies from my stash.

                                                     Here's the pic for you to check out:


The card base measures 4 1/2" × 4 3/4".
For the card layer, I used a sheet of purple patterned paper from a DCWV  Violet Stack paper pad.
I  trimmed it down to 4 1/4" × 4 1/2" and used my tape runner to adhere it.
I added stitching lines using my white gel pen.
With the card base complete, I  turned my attention to the image.

I printed the image on white card stock and used my alcohol markers to color her in.
Here's a rundown of the colors I used:
- Skin - FS7, CR3, E13
-Hair - TN7, EB5, EB8
-Eyes and Lips- GB8, YG03, RV14, RV19


I fussy cut the image out and adhered it to a 3" × 3" patterned paper square from the DCWV paper pad.
Next, I adhered it to the card base at a slight angle.
I then used a wood frame from a Jillibean Soup pack and adhered it over the image using foam tape.

To finish the card off,  I added some stickers from My Mind's Eye and DCWV  to create the sentiment, "You're always so sweet".
Lastly, I added brads and rounded the corners.

                                                         And ta-da!! Card complete!!


                                                 I hope you enjoyed this project for today!
                                  Thanks for stopping by, enjoy the rest of your day.  Peace!! :)


Saturday, August 15, 2015

Hugs Card!!

Hey Everyone!! Happy Saturday to you all! It's Elina here with another card sketch challenge and project for the Feeling Sketchy blog!
                                             Here's the pic for Card Sketch challenge #127:


Make sure to head over to the Feeling Sketchy blog to play along. 
Our sponsor for this challenge is: Bugaboo Stamps with a great prize pack for our winner.
So let this sketch inspire you to create a card or layout.
We love seeing all the wonderful projects you create.

With that said, let's get to the pic of the card I made for this challenge.
I went with a different approach using the sketch above; mainly to fit the image I used from Bugaboo stamps.
Here's the pic for you to check out:


The card base measures 4 1/2" x 6 1/4".
For the image, I printed it on white card stock and used alcohol markers to color it in.
Here's the rundown of the colors I used:
-Flowers- RV14, RV19, Y08, 404, 634, HB3
-Leaves- YG03, 505
-Butterflies and Background- B00, 531, Y03, 404


I layered the image on a sheet of black card stock, marked out my lines to create the grid pattern and cut it out.
Next, I reassembled and attached the pieces on a sheet of white card stock.
I added highlights to the image with a white gel pen and added a few pearls.
I then stamped the sentiment "Hugs" from an Avery Elle stamp set.
I brushed a thin coat of Glossy Accents over the image to mimic the appearance of ceramic tile.

To finish the card off, I used foam tape to adhere the image panel to the card base.

And ta-da!! Card complete!! 


I hope you enjoyed this project for today!!
Thanks for stopping by, enjoy the rest of your day, and Peace!! :)


Pin It Button