Pages

Friday, September 30, 2016

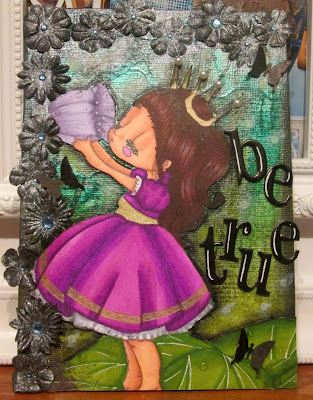
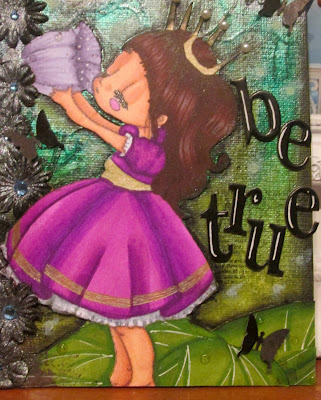
"Be True" Inspirational Canvas Art: LBBS New Stamp Release!!

Hey everyone, happy T.G.I.F to you all! I hope your Friday is off to a great start! Today's post features a project I made for the Little Blue Button Stamps new release. This month Olga has outdone herself again with adorable images perfect for your projects. Using the "Tiny Princess" image, I created a canvas piece starring this lil cutie. If you would like to see all the new stamps plus projects from our fabulous DT members, please head over to the Little Blue Button Stamps shop!
And now, let's move on to the pics of my project for you to check out:


I used a 4 3/4" x 7" canvas board and I using my Recollections spray inks in a shimmery green and blue to add color to the background.
Next I move on to some stamping to add texture to the background.
I used some images from a couple of different Autumn Leaves stamp sets and my Memento Mixed Media ink.
I followed that up by stamping  some text using my Hero Arts "Art is Life"stamp.
I then used my heat tool to set the ink and set it aside to work on my image.

For the image, I used my alcohol inks to color her in and here's a rundown of the colors I used:
-Skin- E00, E11, E13, R52
-Hair- E74, E18, E29
-Dress- Conda brand markers from Hobby Lobby in: 72P, 75P, Gold gel pen, CG22
-Leave- GY83, GY106
-Flower- V20, V25
 

With the image all colored in, I fussy cut her out and adhered her to the background using my tape runner.
Then to add some shading around the image, I used my Faber Castell Big Brush marker in Black, smudging the ink as I applied it.

Next, I decided to add some more flowers for added dimension, arranging them on the canvas and painting them using black paint.
Once they were dry, I used my Recollections spray ink in a shimmery purple to tone it down and add extra sparkle.

To finish he canvas off, I  added blue rhinestones to the flowers centers, pearls to her crown, and a few butterflies I punched using some leftover black card stock.
Lastly, I added chipboard letters to create my sentiment, "Be True" making sure to add a white highlight to each letter.

                                                            And voila! Canvas complete!


                                              I hope you enjoyed this project for today!
                                       Thanks for stopping by and have a great Friday!! :)


Sunday, September 25, 2016

"Birthday Wishes" Card: Glitter N Sparkle's 4th Birthday Celebration!!

Hey everyone, happy Sunday to all! I hope your day is off to a relaxing start! Today's post is a special one. "Happy 4th Birthday Glitter N Sparkle Challenge blog!!" Yeah!! And there are a ton of awesome prizes for you to win. All of the DT members will be choosing their favorite projects. There will also be a main prize winner on the Glitter N Sparkle blog, which will be the overall DT favorite. Pop over to our Fan Page give us a Like and leave a comment, for a chance to win another prize there too. 
And don't forget the prizes from our sponsors. Woo-Hoo!
The theme this week is "Happy Birthday", so make sure to head over to the Glitter N Sparkle blog to play along! 
Phew! Now with all that said, here's the pic of the card I made for you to check out:


          The card measures 4 1/4" x 5 1/2" using a sheet of white card stock as the base.
               I kept the design of this card pretty simple, just sticking to one layer.
I printed the image on the card stock and using a circle die cut from Darice, I cut an opening in the card base.
Next, I colored in the adorable "Kawaii Kitty Ice Cream" image from Bugaboo Stamps.
I colored it in using my alcohol markers and here's a rundown of the colors I used.
                -Fur- CG22, CG24, CG35- Conda brand markers from Hobby Lobby
                   -Birthday Hat & Ice Cream- RV000, RV52, RV55, G40, G43


     I used my CG02 & Colorless Blender Copic markers to add some ground for the image to sit on.
Next, I used a birthday stamp set from Inkadinkado to stamp a birthday cake through the window I cut out earlier.
                 I colored it in using my E18, E29, E79, RV63, RV66, R27, B12 Copic markers.
Then using a fine tip black marker I drew a line to create a table for the cake and colored it in using my C02 marker.

                        Lastly, I stamped some sprinkles on the inside and outside of the card.
And for the sentiment I used a stamp set from the Two Paper Divas and it states, "May your Birthday be filled with sweet Surprises".

                                                              And voila! Card complete!!


                                                  I hope you enjoyed this card for today!
                                Thanks for stopping by and enjoy the rest of your Sunday!


Sunday, September 18, 2016

Adorable "Bride of Frankenstein" Card: Halloween 2016!!

Hey everyone, happy Sunday to all! I hope your day is off to a great start! For today's post, I"ll be sharing the first Halloween card of 2016  I made for the latest challenge over at the Glitter N Sparkle blog! The theme this week is "Anything Goes"! Make sure to head over to the Glitter N Sparkle blog to play along and for a list of this week's sponsors!
The image I used is "Frankie's Bride"  from our sponsor, Digital Delights.
I used the colors from the image to choose the papers and color scheme for this card.
                                                     Here's the pic for you to check out:


                  The card measures 5" x 7 1/2" using a sheet of grey card stock as he card base.
The first card layer is a sheet of purple card stock that I trimmed to 4 7/8" x 7 1/4" and using my tape runner I adhered it to the card base.
Next, I layered two striped papers from The Paper Studio, "Ninth Street" paper pad, to create a second card layer measuring 4 1/2" x 7".
My third and final card layer uses a patterned paper from the Teresa Collins "World Traveler"paper pad.measuring 4" x 6". 

I used my C02 marker to add shading between the layers and my white gel pen to add stitching lines similar to the ones on the image.
With my card base complete, it was time to work on the image.

      I colored this undead beauty using my alcohol markers and here's a rundown of the colorsI used.
                                                           -Skin- G40, G43, G46, RV52
                                         -Hair- Colorless Blender, C02, C03, C04, C06, C08
                                         -Dress- RV63, RV66, RV69, C06, C08, C03, C01

Next, I added some white stitches to her dress and a few highlights with my white gel pen.
                         I cut the image out and adhered her to the card base using pop dots.

To embellish the card, I used flowers from Prima and a flourish strip punch to create this         arrangement, drawing inspiration from the color scheme.
                               I added a brad and rhinestones to the centers of the flowers.
                           As a final finishing touch, Wink of Stella to add sparkle to her dress.

                                                    And ta-da! Halloween card complete!

                  
                                                  I hope you enjoyed this card for today!
                                           Thanks for stopping by and have a great day!! :)


Sunday, September 11, 2016

Steampunk Mermaid feat. Lacy Sunshine Stamps!!

Hey everyone! Today on the blog, I have a card I created for the latest challenge over at the Glitter N Sparkle blog! 
The theme for this week is "Add Some Metal", so make sure to  head over to the Glitter N Sparkle blog for all the details plus a list of sponsors.
The card I'm featuring uses a gorgeous image from Lacy Sunshine Stamps, "Mermella Steampunk Siren".
There is also a coloring tutorial up on my channel that you can check out.

Here are a few pics for you to check out as well:


       The finished card measures 5" x 8 1/4" and uses a sheet of white card stock as the base.
The card layers are a sheet of rust card stock, 4 1/4"x 7 7/8", and blue card stock, 3 1/2" x 7 3/4".
For the image, I colored her in using my alcohol markers and you ca click the video link above to see the process.
                                                   Here's a rundown of the colors I used:
                                                         -Skin- E00, E11, E13, RV000
                                                               -Hair- RV66, RV6, E29
             -Tail & Hat- Chromatix Markers from American Crafts in Teal, Dark Teal, E18, E94, E99


                         I added some sparkle with my Wink of Stella glitter brush marker.
For the sentiment I used a Julie Nutting stamp set ad stamped the words "Party Girl" using my Staz On ink.
              Next, I trimmed the image panel to 3 1/4" x 7 1/2" and adhered it to the card base.

                                                            And voila! Card complete!


                                                 I hope you enjoyed this card for today!
                                         Thanks for stopping by and have a great day!! :)


Monday, September 5, 2016

Hello Card featuring Lemon Shortbread Digi!!

Hey everyone, happy Labor Day to all! I hope your day is off to a fabulous start! Today on the blog, I am featuring a card I made for the latest challenge over at the Glitter N Sparkle blog. The theme for this week's challenge is: "Clean and Simple". So make sure to head over to the Glitter N Sparkle blog for all the details plus a list of this week's sponsors.
My card today features a beautiful digi from Lemon Shortbread entitled "Kimono Sakura Girl".
                                                     Here's the pic for you to check out: 


                The card measures 3 3/4" x 5 1/2" and uses a sheet of white card stock as the base.
 I printed the image on a separate piece of white card stock and used my alcohol markers to color her in.
                                                     Here's the rundown of the colors I used:
                                                          -Skin- C01, Colorless Blender
                                                                -Hair- C04, C06, C08
-Kimono- RV000, RV52, RV63, G94, G99, Gold Gel pen, Sakura White Gel pen, C02, Colorless Blender

           I colored in a few cherry blossom petals using my RV000 and RV63 Copic markers.
With all the coloring done, I trimmed the image panel down to 3 1/2" x 5 1/2" and added an 1/8" gold border to frame it.

Next I attached it to  the card base and wrote the "Konichiwa" sentiment using my 100 Black Copic marker.

                                                            And voila! Card complete!


                                                 I hope you enjoyed this card for today!
                                           Thanks for stopping by and have a great day! :)


Thursday, September 1, 2016

Expanding my Crafty Horizons: Handmade Bluebird of Happiness Sock Plushie!

Hey everyone, happy Thursday to you all! I hope your having an awesome day! On the blog today, I have an adorable sock plushie that I made. Now I have never made a plushie before but leave it to YouTube to inspire me to make one. Luckily I had the supplies needed for this project in my craft room. I used a fluffy sock, some felt, needle and thread, a marker and pastels to create my bluebird of happiness plush. This was a really fun project to make and I hope to make a few more to share with you.
                                                  Here are the pics for you to check out:


I used fiberfill to stuff my plushie, E6000 glue for the eyes and a black marker to add eyelashes.

And ta-da! Sock Plushie complete!


I hope you enjoyed this project for today!
I hope I have inspired you to "expand your crafty horizons" and try a new project or technique for yourself.
You might be surprised by what you create! 
Thanks for stopping by and have a great day!! :)


Pin It Button