Pages

Monday, August 29, 2016

"Learn something New" Back to School Card!

Hey everyone! I hope  your day is off to a great start! For today's post, I have a card I created for the latest challenge over at the Glitter N Sparkle blog! The theme for this week's challenge is "Back To School" and we have some great prizes for you to win. So make sure to swing by the Glitter N Sparkle blog for a list of sponsors.
The card I'm showcasing today features a beautiful image from Crafts & Me "Book Worm Fairy".
                                                     Here's the pic for you to check out:


The card measures 5 7/8" x 5 7/8" and uses a sheet of pink card stock as the base.
For the card layer, I cut a sheet of  black card stock to 5 3/4" x 5 3/4"and adhered it to the card.
Next I printed out the image and colored her in using my alcohol markers.
Here's the list of colors I used:
-Skin- E00, E11, E13, RV52
-Clothes & Wings- RV000, RV52, RV55, RV63, C02, C04, 100
-Accessories- G43, G94, E99, E29, B00, B12, C01, C03, Colorless Blender


 Once I had the image colored in, I decided to create a subtle background.
I thought that rows of books would work but I wanted to keep the look soft with the focus beig o the main image.
I penciled in the shelves and books using a ruler to keep the lines straight.
Next I used my E00, Y00, RV000, G40 Copic markers to add a little color and then softened the look with my Colorless Blender.

I trimmed down the image panel to 5 1/2" x 5 /2" and adhered it to the card base.
I added a few butterflies that I punched out of white card stock and colored them in using the same color scheme as the main image.
To finish it off, I adhered a few pink sequins and hand wrote the "Today learn something new" sentiment using my 100 Copic marker.
And voila! Card complete!


I hope you enjoyed this card for today!
Thanks for stopping by and have a great day! )


Friday, August 26, 2016

Sending Hugs & Sweeet Dreams Card feat. LBBS Stamps!!

Hey everyone, happy Friday to you all! I hope your day is off to a great start! Today on the blog, I have a card I created for the LBBS new stamp release for this month. The image I used is entitled "Sleepy Panda," and is such an adorable image to add to your LBBS collection! I created a background scene for this panda to set the tone of the card. I then drew and inked in the details and challenged myself to stick to a few Copic colors to bring this scene to life.
                                                
                                                         Here's a pic for you to check out:


The card measures 6" x 6 1/4," and uses a sheet of white card stock as the base.
First, I worked on the image; drawing in the background and coloring it in.

Here's a rundown of the colors I used:

 -Panda- PrismaColor markers in Warm Grey, Warm Black
-Robe, Mask, Bow- RV000, RV52, RV55, B00, B12
-Wall & Floor- Y00, Y15, RV52, RV55, B12, E99, E29
-Rug, Nightstand, Lamp, Glass- RV000, RV52, RV55,Y00, Y13, Y15, B00, B12


            With the image and background colored in, I trimmed the image panel to 5" x 5 1/8".
Next, I added some sparkle with my Wink Of Stella Glitter Brush pen. I then used an Avery Elle stamp set for the sentiment, "Sending Hugs". Using the colors from the image, I chose blue and pink card stocks as my card layers. I mounted the image first on the pink, leaving an 1/4" border all around, and then on the blue card stock, leaving a 1/4" border all around. Finally, I mounted the completed panel on the card base.

                                                            And ta-da! Card complete!


                                                   I hope you all enjoyed this card for today!
                                          Thanks for stopping by, and have a great weekend! :)


Post edited by: Shyann Martinez

Sunday, August 21, 2016

"Enjoy Life" card feat.Ike's Art Stamps!!

Hey everyone, happy Sunday to you all! I hope your day is off to a relaxing start! For today's post, I have a card I made for the latest Glitter N Sparkle challenge. Unlike previous challenges where there is a theme for you to follow, this week's challenge features a sketch made by yours truly.


This was my first time creating a Card Sketch from scratch but I'm pretty pleased with how it turned out. The ladies did a wonderful job using my sketch to create their wonderful cards. I'm not sure if I'll continue to make card sketches in the future, but I had fun creating this one. So, please make sure to stop by the Glitter N Sparkle blog to play along. As always, we have some great sponsors lined up with awesome prizes for you to win. The card I'm featuring today uses a wonderful image from one of our sponsors, Ike's Art entitled "Birthday Fashionista".
                                                   
                                                         Here's a pic for you to check out:


The card measures 5 1/4" x 5 3/4," and uses a sheet of grey card stock as the base. Using the sketch above, patterned paper from The Paper Studio "Chevron" pack, and white card stock, I cut my card layers at 3 1/8" x 5 1/2" (for the chevron paper) and 1 1/2" x 5 1/2" (for the white card stock). I adhered them to the base, and for the white card strip, I added a layer of grey card stock at 1 1 3/8" x 5 3/8" and 1 1/8," with chevron squares on top. I added brads to the center of the squares and set them aside to work on the image.

                                        Here's a rundown of the colors I  used for the image:
                                                    
                                                         -Skin- E00, E11, E13, RV52
                                                               -Hair- Y13, E29, E79
-Coat, Pants & Bag- Prismacolor's Warm Grey, Warm Black, C02, C04, RV14, RV19, C01, C03
                                                                -Ground- C01, C03


Next, I trimmed down the image panel to 2 5/8" x 5 1/8," added a piece of grey card stock to the back, and adhered it to the base. I then added a wavy border and black sequins to complete the look.

As a final touch, I used some clear acrylic words from my stash to create the "Enjoy Life" sentiment.

                                                          And ta-da! Card complete!


                                                 I hope you all enjoyed this card for today!
                                   Thanks for stopping by, and enjoy the rest of your day!! :)


Post edited by: Shyann Martinez


Sunday, August 14, 2016

Just for You Card: Realistic coloring using Copics!!

Hey everyone, happy Sunday to you all! I hope your day is off to a relaxing start! For today's post, I have a card I made for the latest Glitter N Sparkle challenge! The theme this week is "Anything Goes," and as always, we have some great sponsors lined up for this challenge! So, please make sure to head over to the Glitter N Sparkle Challenge blog for all the details.

My card today features an awesome image from Robyn's Fetish, "Apples in a Basket"
                                                 
                                                       Here's a pic for you to check out :

            
The card measures 4 3/4" x 5 1/4" and uses a sheet of craft card stock for the base. To add a little interest to the card base, I stamped some fall leaves using my VersaMark ink. For my card layer, I cut a piece of chevron paper at 4" x 4 !/2" from The Paper Studio Chevron paper pad.
                 
Next I moved on to the image, coloring it in with my alcohol markers.
                                               
                                                  Here's a rundown of the colors I used:
                                            
                                               -Apples- Y15, R14, R17, R27, Y00, Y13
                                               -Basket- E99, E29
                                               -Bow- R14, R17, R27, E74
                                               -Sky & Grass- B00, B12, G43, G4

 To get a more realistic feel to the image, I referenced a photo I found on Google.
So, by adding the Y15 as my base color and then adding the R14, R17, R27 in certain areas, I was able to achieve a more realistic look to the apple.
I approached the coloring of the basket in much the same way, by adding lines using my E29 and then softening it with my E99.
For the sky and the grass, I laid down my lightest base color, B00, G43, and then adding my darker shades, B12, G46, to add texture and shading.

I then trimmed the image panel down to 3 3/4" x 4 1/8" and adhered it  to the card.

Finally, I added my sentiment, "For You" with some twine tied in a bow.

And voila! Card complete!


                                                  I hope you all enjoyed this card for today!
                                               Thanks for stopping by and have a great day! :)


                                                    Post edited by: Shyann Martinez

Tuesday, August 2, 2016

Wood+Prima+Finnabair= Unique Mixed Media Decor Piece!

Hey everyone, happy Tuesday to you all! I hope your day is off your day is off to a great start! For today's post I wanted to share a mixed media project I made for my home. I used supplies from my stash, paint, and texture paste on a 6 1/2" x 10 1/2" wood board to create a unique wall hanging.
                                 So without further ado. here are the pics for you to check out:

Completed wall hanging.


 I used gesso, texture paste, acrylic paints in ivory and blue as well as Bronze Distress Paint to create the background.


Close up of the piece.
I used pieces from Prima, Finnabair, Tim Holz and  Hobby Lobby's Spare Parts line.
I arranged them on the board, adhered them and painted them using the colors I used for the background.

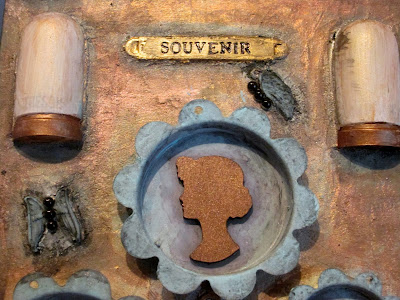
Close up of the top of the piece.
                                      I arranged pieces of sea glass along the top and bottom.
I used my texture paste to adhere them and painted them using Liquitex Metallic Paints in Rich Gold and Bronze.


         For the butterflies I used angel wings charms from Spare Parts and pearls for the bodies.

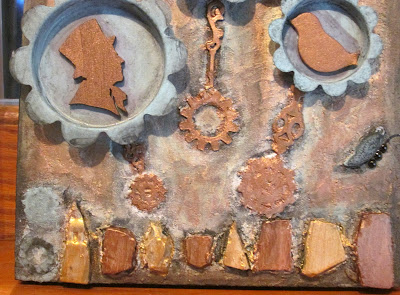
Close up of the sea glass pieces, gears and butterflies.


Close up of the bottom half of the piece.


 To achieve the look of flowers I used my Prima Wood Icons for the centers and my Finnabair Mechanicals for the blooms.
I used some gears and clock hands from Spare Parts to create the stems.


As a finishing touch I added shading around each of the pieces using my Faber-Castell Big Brush Marker in Black.

                                                           And voila! Piece complete!


                                              I hope you enjoyed this project for today!
                                        Thanks for stopping by and have a great day! :)


Pin It Button